
Welcome Git Admin!

You are probably reading this page because a Jira administrator has requested access to the Git server. The Jira administrator has installed the Git Integration for Jira app.
What is the Git Integration for Jira app?
The Git Integration for Jira app pulls data from a Git source code control repository. Jira users will be able to see code in Git in context with Jira projects and issues. Even non-technical users will be able to see Git in the familiar Jira interface.
Jira users will be able to securely browse content in Git without requiring you to create IDs for every user.
How does Jira interact with the Git server?
The Git Integration for Jira app acts as a regular Git client. It performs a scheduled pull from the repository.
What does the Jira administrator need?
The Jira administrator needs the ability to clone the repository and pull from it just like a regular developer workstation would do.
We recommend that you create a new user identity specifically for this Jira server.
For Git repositories with HTTP/HTTPS access
Please do the following:
- Create a new user for the Jira server.
- Send the Jira administrator:
The URL to the Git server
For example: https://gitserver/repo/timetrackingproject.git
- The username and password for the user you created
For Git repositories with SSH access
Please do the following:
- Define a new SSH public/private key pair for the Jira server.
- Install the public key on the Git server
- Send the Jira administrator:
The URL to the Git server
For example: git@gitserver:repo/timetrackingproject.git
- The private key you created
For Git repositories with Git protocol access
Send the Jira administrator the URL to the Git server.
For example: git://gitserver/repo/timetrackingproject.git
For Git repositories on the same host as Jira
Send the Jira administrator the full path to the Git repository.
For example: /home/git/repo/timetrackingproject.git
For Git repositories across network file shares
If you have users access the Git repository over a network file share using Windows file sharing or NFS, the network share will need to be mounted on the Jira server. Assist the Jira administrator in mounting the network share. Then, provide the Jira administrator with the path to the Git repository over the network share.
Linux example: /mnt/gitserver/home/git/repo/timetracking.git
Windows example: \\gitserver\git\repo\timetracking.git
For Git repositories hosted on Windows servers
For cases when git repositories are hosted at Windows servers (Windows Server network drive) – while it is using the Windows server networking, the network credentials accessing the git repository must be the same as the user running Jira.
The repository setting for Enable Fetches of the configured network path must be Git Repository hosted on same server as Jira.
For Jira hosted on Windows
When using Active Directory accounts for repository access, changing the password of the AD account running Jira can cause repository authentication issues.
Restart Jira to regain access to repositories.
Setup GitLab Server to Respond to Incoming Network API Calls
In order for GitLab to display correct repository clone links to your users it needs to know the URL under which it is reached by your users (e.g. http://gitlab.example.com)
To reconfigure:
- Access the GitLab configuration file in /etc/gitlab/gitlab.rb.
sudo vi /etc/gitlab/gitlab.rb - Change the external_url value to your GitLab server URL.
external_url "http://gitlab.example.com" #this is the default URL external_url "http://X.X.X.X.local/" #change it to your GitLab Server URL - Run the reconfigure command to make the change take effect.
sudo gitlab-ctl reconfigure
Read this GitLab documentation to know more about configuring the external URL for GitLab.
You should be able to add the GitLab repositories via Git Integration for Jira app > Connect to Git Repository / Auto-connect.
New GitLab v10+ Authentication
GitLab v10+ stopped accepting username/password credentials for API access and will only recognize Personal Access Tokens (PAT) and OAuth authentications. Service users are strongly advised to switch from using username/password for GitLab.com and newer versions of GitLab Server (CE/EE) to using Personal Access Tokens.
For GitLab Server service users, they won't see the issue until they upgrade their GitLab Servers to version 10 and higher. Git Integration for Jira app offers pre-v10 GitLab Server users as a Legacy connection option.
To access a Git repository over HTTP, use the username as the username and the PAT for the password.
To pass the private access token (for example: XpigzF1JxMnAZ7mn9qgN) to an API call with GitLab.com:
curl --header "Private-Token: XpigzF1JxMnAZ7mn9qgN" https://gitlab.com/api/v4/projects?membership=trueFor more information on GitLab personal access token, see GitLab: Personal Access Token.
General Settings: Improving Jira Performance
Improving Git Tags Performance
Git tags and branches are cached for the most recently viewed 1000 Jira issues (across all Jira projects). The cache is reset each time a new change in any repository is detected. The cache is built the first time an issue with a tag and/or branch is loaded by a user. Subsequent loading of Jira issues with tag or branch information will utilize cached values.
Enabling the display of Git tags in commits for large repositories can affect the performance of Jira. This setting can be disabled by doing the following steps:
- Go to Jira Administration > Applications. (Jira 6.x – Administration > Applications)
- On your sidebar under Git Integration for Jira, select General settings.
- Look for the Git Tags setting and uncheck it.
- Click Save to save and apply the setting.
Improving Diff Load Performance
There's a default limit to the size of files that the diff'er supports which is 16MB. This is to keep a massive file from impacting the Jira server performance too much.
As of v2.8.5 of the Git Integration for Jira app, Jira administrators can control over the size of diffs allowed to be displayed in the code diff dialog:
- Go the Administration > Applications.
- Under Git Integration for Jira on the sidebar, select General.
- Scroll down to Diff then set the Max Diff Line Count value as desired. Maximum supported value is 20000.
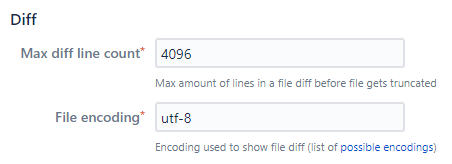
Do note that setting this value higher than the default value will impact the performance when loading the code diff of the selected file in the Git Commits tab. The code diff dialog will truncate the view for each 1500 lines code. To see the rest of the code, manually expand the view.
Enable/Disable JQL Search Feature - Introduced v2.12.0+
Go to Jira Administration > Applications > General.
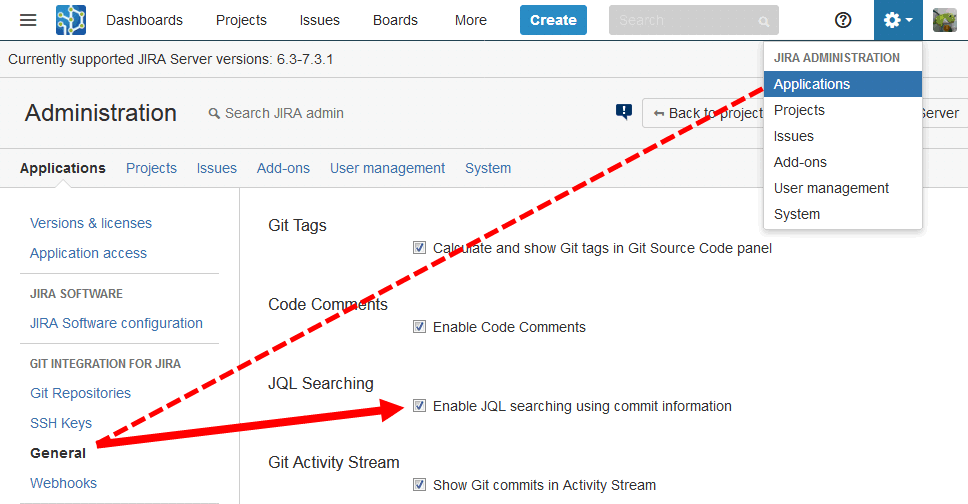
This general setting allows administrators to enable/disable the JQL functions within the Git Integration for Jira app.
Smart Commits
To improve performance, turn off smart commits on initial indexing then turn it back on after initial reindexing.

Commit Notification Emails
Enable/disable the setting to allow sending of email notifications when a commit is made. This setting defaults to OFF for upgrades and ON for new installation of the Git Integration for Jira app.
Access this setting via Jira Administration > Applications > Git Integration for Jira > General.
Turn off this setting to improve Jira performance.
Git Activity Stream
Enable/disable the setting whether to show git commits in the Jira activity stream (Issue page or dashboard widget) or not. For in-place upgrade of the Git Integration for Jira app, this setting is turned off by default. For new installation, the default setting is enabled.
Access this setting via Jira Administration > Applications > Git Integration for Jira > General.
Adding a Repository Hosted on Windows Servers or Windows Network Share
Add a new network share or Windows server hosted repository via the Connect to Git Repository wizard.
The wizard will continue without errors if the following conditions are met:
- The network credentials accessing the git repository must be the same as the user running Jira.
- The network path is not longer than 255 characters.
- The user under which Jira is running should have read access to network path.
In the Git configuration page, edit the repository via Actions > Edit repository.
Under Repository Settings, set Enable Fetches option to Git repository hosted on the same server as Jira.
Considering the above conditions, verify if the repository can be cloned successfully using the network path. With the server which hosts Jira, start the command-line session under the same user which Jira is running on.
For example:
$ git clone file:////Ws148/Photo/repo
Cloning into ‘network-repo’...
If the path is invalid, does not exist or has permission issues, an error similar to the following will be displayed:
fatal: '//Ws148/Photo/repo' does not appear to be a git repository
fatal: Could not read from remote repository.
Please make sure you have the correct access rights
and the repository exists.
For more information, see Documentation: Adding a Repository Hosted on Windows Servers or Windows Network Share.
Setting Up Repository Root Not Located in Jira Home Directory
There are three possible ways to setup a repository root that is not located in the Jira home directory:
- Clone the repository outside of Jira then connect to it via Connect to Git Repository > Advanced Setup.
- Clone the repository with the standard Connect to Git Repository Wizard into the Jira home directory. Soon afterwards, move the cloned repository and update the settings on the repository.
- You could symlink the {$JIRA_HOME}/data/git-plugin directory to a different volume. The standard Connect to Git Repository Wizard will still write there, but the data will reside on the different volume. But be aware, that the Git Integration for Jira app treats anything in the Git-Plugin folder as a clone that it owns.
Does the Git Integration for Jira app have API commands that allow addition/removal of a Git project?
Yes. As of v2.8.3 of the Git Integration for Jira app, the REST API for add, update, and delete repository is implemented. The documentation for this feature is available at Git Integration for Jira: Hook and API Reference - Repository REST API.
Reindex API to Trigger Indexing
Call the Reindex REST API to have more control on indexing.
Reindex POST API
Use this method to start the reindex process in a separate thread. Example:
http://jira.yourorg.com/rest/gitplugin/1.0/index.jsonReindex GET API
Use this method to track messages for a particular thread. Example:
http://jira.yourorg.com/rest/gitplugin/1.0/index.json?threadId=eafe58fc-d8de-42ff-8815-6fe5860b38d2For more information, see Git Integration for Jira: Reindex REST API.
Recommended Reindex Interval Setting
The configuration of the scheduler jobs are no longer accessible in the Jira administration page. For this case, the Git Integration for Jira app offers Jira administrators this capability via the General screen.
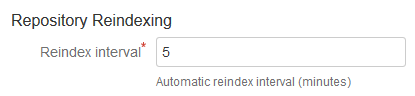
Set the automatic reindex interval frequency value in minutes as required. The default value is 5 minutes. Min = 1, Max = 76,861,433,640,456.
Regardless of the time to index, the reindex interval is the amount of time between the currently completed reindex task until the next reindex.
Improving Jira performance depends on the duration value of the RevisionIndexJob. To see the Last run duration value:
- Go to Administration > System.
- On the sidebar, select Scheduler details.
- Scroll to com.xiplink.jira.git.revisions.RevisionIndexJob.
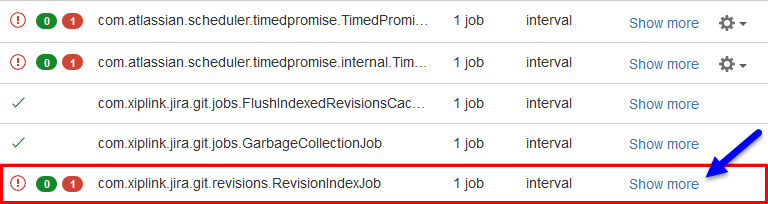
- Click Show more under the Actions column.
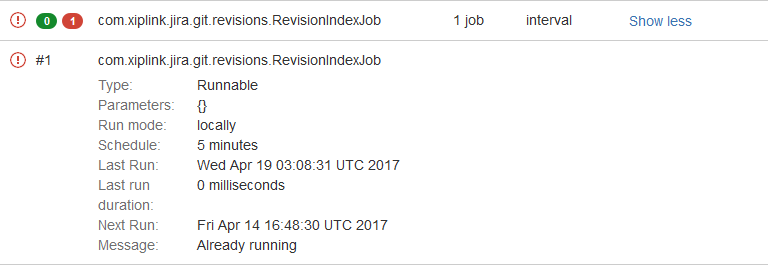
If the Last run duration value shows 3 minutes or greater, we recommend to increase the reindex interval.
Setting Up Web Linking
The web linking feature adds links to your git hosting provider directly into the Git Commits tab.
Configure Web Linking for GitHub/GitLab
For more information, see Documentation: Web Linking.
Setting Up Webhooks
Trigger immediate reindex of your repositories from remote systems via webhooks.
Go to Administration > Applications > Git Integration Plugin for Jira > Web Hooks.
Enable/disable the webhook feature by clicking on the Enable webhook checkbox.
The Secret Key is a secure random-generated alphanumeric string at the time of the Git Integratin for Jira app installation. The user can change this to a different value by generating another secret token according to your Git host.
Use this key in the form of:
<JIRA_BASE_URL>/git/webhook/reindex/<SECRET_KEY>Assign your Jira base URL and Secret Key to the sample URL structure. Example:
https://your.jira.com/rest/gitplugin/webhook/1.0/reindex/sdf34tGdfgGDG345g3y0045TYG23te37All the repositories will be reindexed if the URL specified above is activated through GET, POST, or PUT and the webhooks are enabled. There is no support for other HTTP methods such as DELETE or HEAD.
The Git Integration for Jira app supports GitHub and GitLab push events to define individual repository to index.
Adding Webhook for GitHub Repository
Adding Webhook for GitLab Repository
Webhook GitHub Organization Support
As of v2.12.8+ of the Git Integration for Jira app, the GitHub Organization webhooks is now supported. Rather than creating a webhook for each repository manually, configure the webhook at the GitHub Organization level to automatically register webhook for each repository.
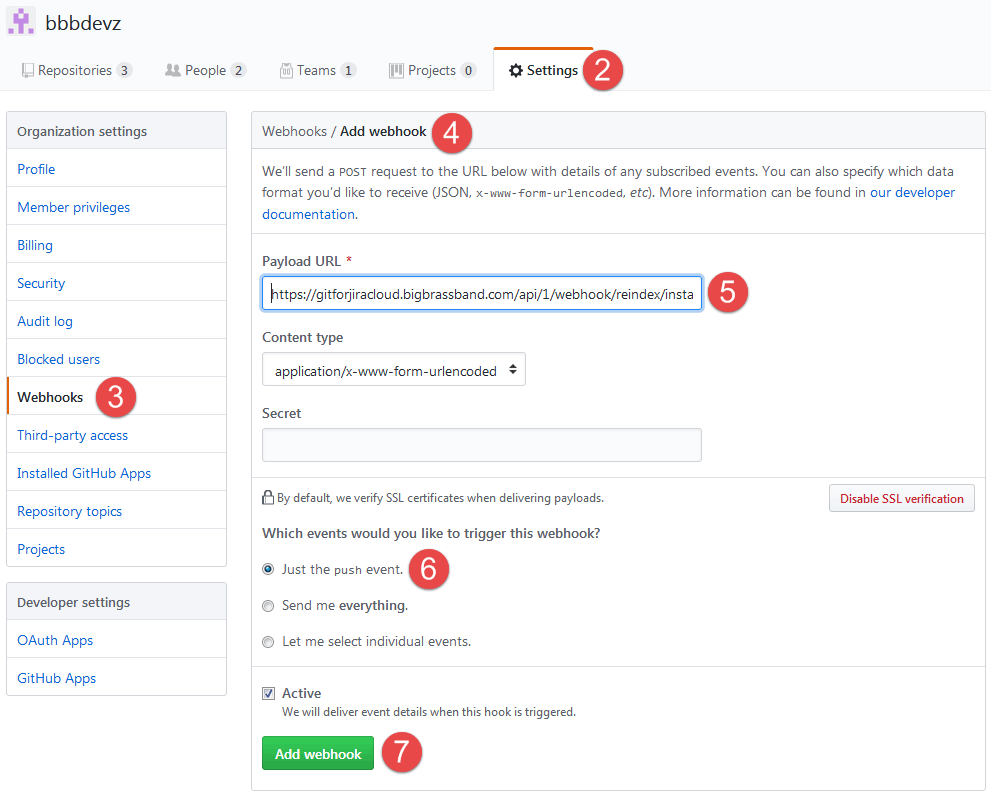
To configure GitHub organization webhook:
- Login to your GitHub account and go to your GitHub Organization.
- Go to Settings.
- Under Organization Settings, go to Webhooks.
- Click Add webhook.
- Paste the webhook URL into the Payload URL field. (The webhook url is acquired from the Git Integration for Jira app webhook configuration page.)
- Select/enable the "Just the Push event" trigger.
- Click Add webhook to complete this setup.
For more information, see Documentation: Webhooks.
Increasing Timeout Threshold for Large Repositories while Doing a Git Pull
For this workaround to work, the user must have an access to a Jira hosting instance:
- Login to the hosting server.
- Create a new directory in the path different from the JIRA HOME directory. For example, ~/Image-repo/
- Go to a directory and perform a clone of a repository:Or use the generic clone:
git clone --mirror git@gitserver.com:repo/url.git1git clone git@gitserver.com:repo/url.git21 Modify the git repository URL to the correct one.
2 Using the generic clone may take a bit longer and requires more disk space to store.
- For ~/Image-repo/ directory, give read and write permissions to the same user running Jira. For example, to make the user named user be an owner of a folder, perform the following command:
sudo chown user ~/Image-repo - Using the local path, connect the repository via the Git Integration for Jira app Advanced setup wizard. Use the correct local path for the Git for Jira app to successfully detect the repository.
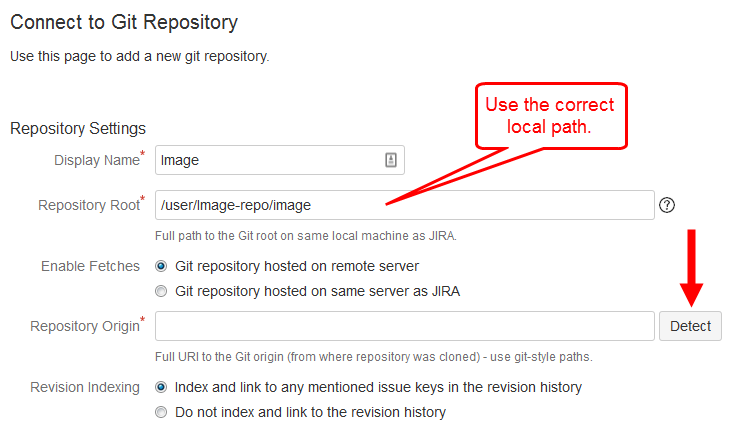
- Click Detect to specify the origin value.
- Configure other settings if required. Click Add to proceed.
The repository is added and indexing should work.
In v2.12.0 of the Git Integration for Jira app, the General setting for Git operations timeout was implemented.

This setting affects how long will Git Integration for Jira app waits for connections performed during git clone and git fetch. BigBrassBand recommends to increase the time value if you have large repositories and in some cases, connecting to them mostly results in timeout.
If you have several large repositories and have a problem with exceeded timeout, we recommend that you use our Tracked Folders feature to scan local folders at once and import repositories automatically.
Tracked Folders (Jira Server only)
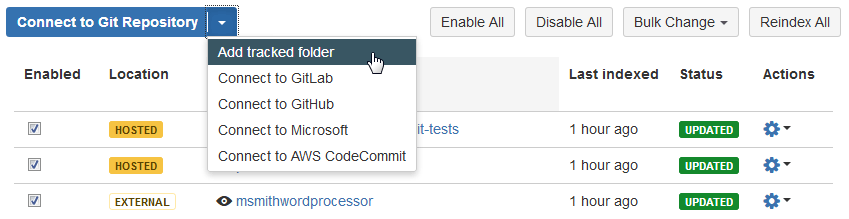
This feature scans a locally accessible path for cloned Git repositories and automatically imports those Git repository references into Jira. A repository group called TRACKED FOLDER is added in the Git Integration for Jira app repository settings.
The Tracked Folder feature helps save disk space in case of a mounted folder. Thus, improving Jira performance.
If you have a local folder that contains multiple repositories, the Git Integration for Jira app will auto-detect and connect this folder to Jira as a tracked folder.
For more information, see Integration Guide - Adding Tracked Folders feature
Recommended Upgrade Method for Git Integration for Jira
If you have installed the Git Integration for Jira app with versions prior to v2.10.2, perform the following steps to upgrade with minimal risk:
- Do the upgrade at night – when the number of Jira users is minimal.
- Make backups.
- Make a Jira backup (recommended). The Git for Jira app upgrade only updates its components. Thus, it has no adverse effect to Jira. It is still better to make a backup of your Jira before any app upgrade as a safety measure.
- Make a Git Integration for Jira app backup (recommended). Make sure to do a backup of the Git connection configuration.
- Perform a bulk export of your existing repositories in the Git Integration for Jira app repositories configuration. (Go to Administration > Applications > Git Repositories > Bulk Change > Export Configuration. For detailed steps, see Bulk Change > Export Configuration.)
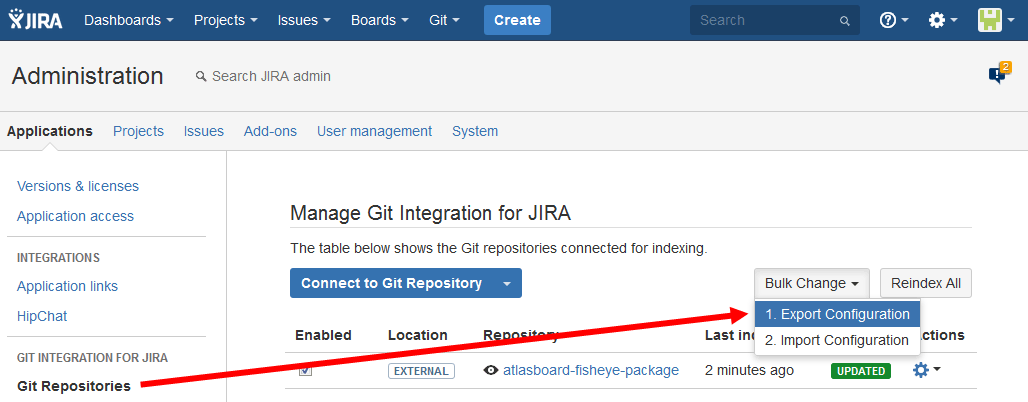
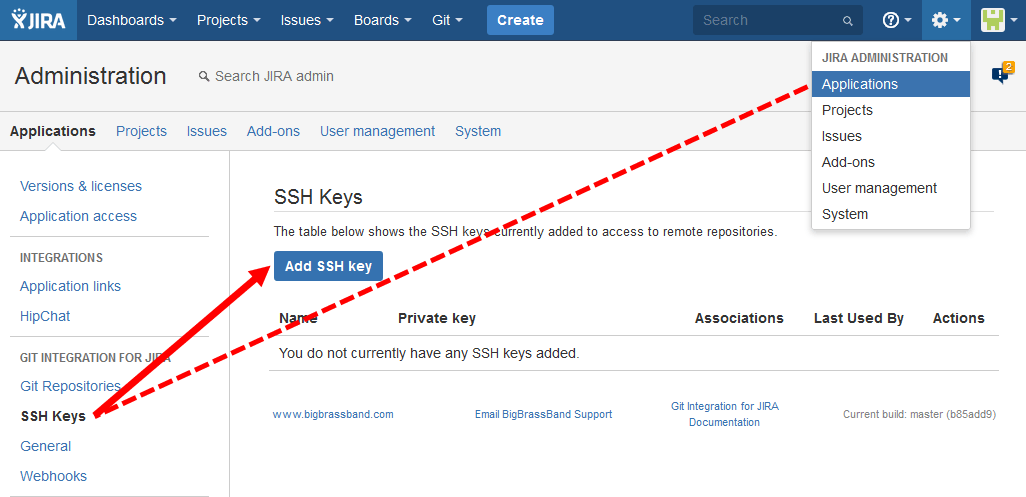
- Make sure that you have all the required SSH keys uploaded to the Git for Jira app (Go to Administration > Applications > SSH Keys). This will make seamless connection of the git repositories to Jira via Bulk Change > Import Configuration.
- Perform a bulk export of your existing repositories in the Git Integration for Jira app repositories configuration. (Go to Administration > Applications > Git Repositories > Bulk Change > Export Configuration. For detailed steps, see Bulk Change > Export Configuration.)
- Upgrade the Git for Jira app to the latest version.
Another option is to completely uninstall then reinstall the Git for Jira app. This will result in Jira running on a clean state:
- Backup the Git repositories configuration via the Git for Jira app Bulk Export.
- Fully uninstall the Git Integration for Jira app – follow these instructions.
- Install the Git Integration for Jira app via UPM.
- Add all required SSH keys again by uploading them into Git for Jira app > SSH keys.
- Using the file from Bulk Export, import all your repositories via Bulk Change > Import Configuration.
- Manually reindex the repositories based on its usage priority or click Reindex all to reindex them all at once.
Discard Cloned Files in Jira Home Directory General Setting
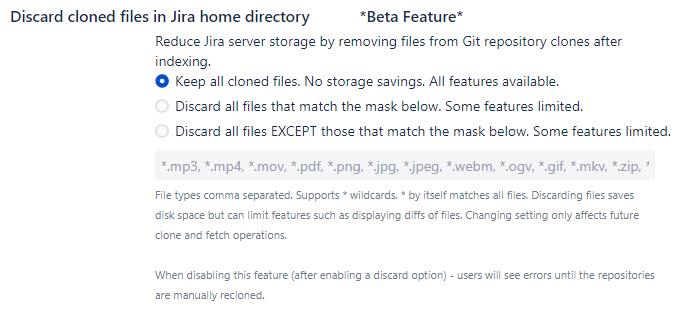
This feature will reduce Jira server storage by deleting files from cloned git repositories after indexing. Discarding files can save disk space but may limit some features such as displaying diffs of files.
Access this feature via Jira Administration > Applications > Git Integration for Jira > General.
There are three options to choose from:
- Keep all cloned binary files. No storage savings. All features available This option will leave all cloned repositories intact.
- Discard all files that match the mask below. Some features limited. This option will delete all files in the cloned repositories matching the declared file extensions.
- Discard all files EXCEPT those that match the mask below. Some features limited. This option will delete all other files in the cloned repositories except those files with extensions declared.
Select any option with the discard label to enable editing of the file mask field.


